Parts of a Microscope
Free printable parts of a microscope diagram — a labeled compound microscope showing the eyepiece, objective lenses, stage, focus knobs and more. Download a high-resolution PDF or PNG for Letter paper.
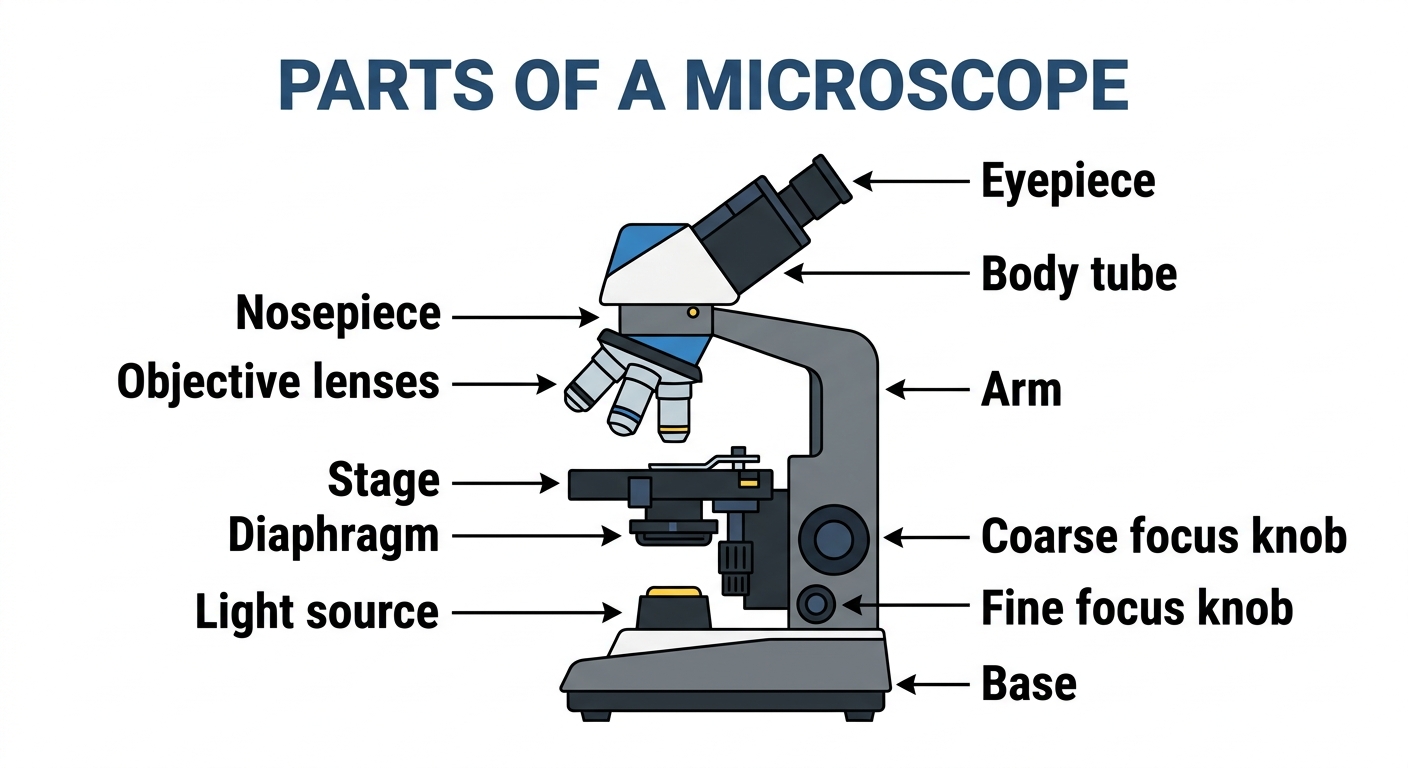
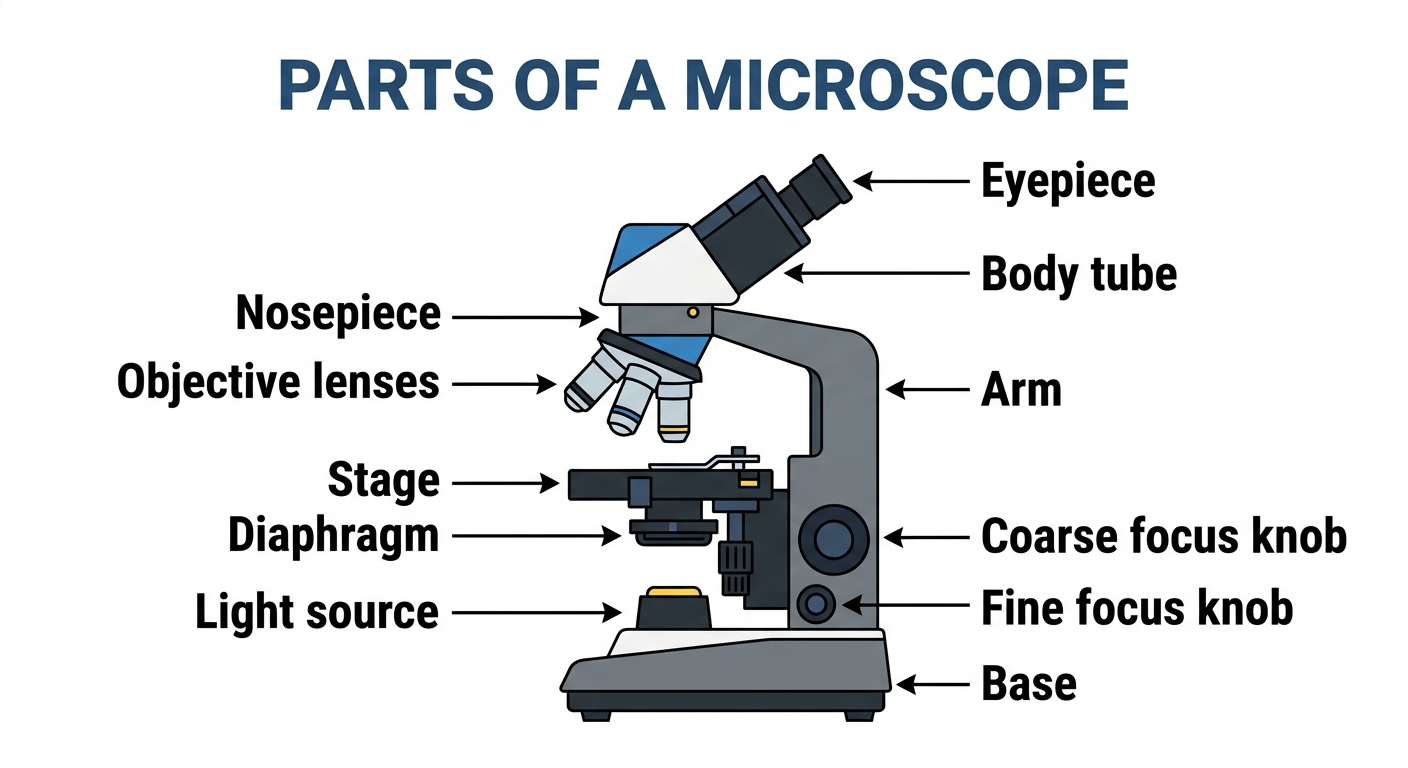
The parts of a microscope
A microscope is a tool that makes tiny objects look much bigger, so we can study things that are too small to see with our eyes alone. Here is what happens at each labeled part of the diagram:
| Part | What it does | Why it matters |
|---|---|---|
| Eyepiece | The lens at the top that you look through; it usually magnifies ten times. | This is the final magnifier in the chain — it takes the already-enlarged image produced by the objective lens below and stretches it ten times bigger before it reaches your eye. Without it, you would see a much smaller, dimmer image and miss fine details that make scientific observation possible. |
| Body tube | Connects the eyepiece to the objective lenses. | The distance between the eyepiece and the objective lens is not random — it is precisely calibrated so the two lenses magnify in sync. If the tube were the wrong length, the image would come into focus at the wrong point and everything would look blurry no matter how carefully you turned the focus knobs. |
| Arm | The curved part that supports the tube and is used to carry the microscope. | Microscopes are precision instruments, and even a small bump can knock a slide out of position or crack a lens. Always carrying it by the arm keeps the delicate optical parts stable and protects the light source at the base from being jarred loose. |
| Nosepiece | The rotating piece that holds the objective lenses and lets you switch between them. | Switching magnification mid-observation — say, from 4x to 40x — would be impossible if you had to unscrew one lens and screw in another each time. The rotating nosepiece lets you click to a higher power in seconds while keeping the slide exactly in place. |
| Objective lenses | The lenses close to the object that do most of the magnifying. | These lenses do the heavy lifting of magnification, and most microscopes carry several at once — commonly 4x, 10x, and 40x power. A bacterium roughly one micrometer wide becomes visible only when an objective lens has magnified it hundreds of times before the eyepiece even adds its share. |
| Stage | The flat platform where you place the slide you want to look at. | A glass slide holding a sample must sit perfectly flat and still directly in the light path, or the magnified image will wobble and blur with every vibration. Many stages include small metal clips and a mechanical arm so you can nudge the slide millimeter by millimeter without touching it with your fingers. |
| Diaphragm | Controls how much light passes up through the slide. | When the diaphragm contracts and flattens, it pulls air into the lungs like a pump; when it relaxes and domes back up, it pushes air out — breathing is almost entirely the work of this single muscle. A hiccup is just the diaphragm contracting in a sudden, uncontrolled spasm, snapping the vocal cords shut and making that unmistakable sound. |
| Light source | The lamp at the base that shines light up through the slide. | Most of what biologists study — cells, bacteria, thin tissue slices — is nearly transparent, so light must shine through it from below to make it visible at all. Modern microscopes use LED lamps that stay cool and steady, because heat from an old incandescent bulb could literally cook a living cell sample. |
| Coarse focus knob | The larger knob that moves the stage up and down quickly to focus. | When you first place a slide and peer through the eyepiece, the stage may be so far from the lens that you see nothing but gray fog. The coarse knob closes that gap quickly, bringing the sample into rough focus so you are not searching blindly — though using it at high magnification risks crashing the lens right into the slide. |
| Fine focus knob | The smaller knob that makes tiny adjustments for a sharp image. | At high magnification, the zone of sharp focus can be thinner than a sheet of paper, so even a tiny wobble sends the image blurry. The fine focus knob moves the stage in increments so small you can thread through a single layer of cells and observe exactly the depth you want. |
| Base | The bottom of the microscope that supports the whole tool. | A heavy, flat base is what separates a precision scientific instrument from a toy that tips over — the whole optical system above it is only as stable as the foundation beneath. Because microscopes are often used on crowded lab benches, the wide base keeps the tool upright even if someone bumps the table. |
Companion worksheet
A free fill-in worksheet with an answer key, built from the labels above — students match each part to its description, then answer a couple of short questions. Great for a quick check after using the diagram.
How to print
Choose Download PDF for a ready-to-print file that fits US Letter paper (8.5 × 11") in landscape, or Download PNG for the high-resolution image.
Frequently asked questions
What are the main parts of a microscope?
The eyepiece, body tube, arm, nosepiece, objective lenses, stage, diaphragm, light source, coarse and fine focus knobs, and base.
What do the coarse and fine focus knobs do?
The coarse focus knob makes big, quick changes to focus, while the fine focus knob makes small adjustments to get a sharp, clear image.
What paper size should I print this on?
The diagram is sized for standard US Letter paper (8.5 × 11") in landscape orientation. Use "Download PDF" for a print-ready file that fits the page automatically.